Posts

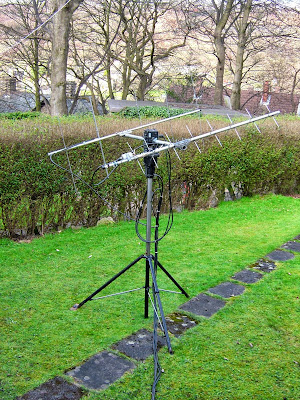
Testing Out The New Satellite Antenna

Image
Here is a quick video of the latest satellite gear in action. The first Call I made is through SO-50 on FM, followed by 3 QSO using SSB via VO-52 with SQ9MES - IW4BIF - EA6SA. Thanks for all the comments regarding this project, as you can hear in the video I am getting my signal into the satellites quite well with the Ft-847 and Tripod array. I hope to work some more of you via the "birds" as its always a pleasure to catch some of you guys that actually follow my crazy antics. 73 Happy DXing and SAT Chasing.

Vertical Polarisation Is the Icing On The Cake

Image
I have been having some good results with the latest Satellite array but still found AO-51 a little difficult at times due to the regular European pile up hi hi. However, after receiving an interesting comment from Tom - F8COD regarding the Sat antenna set up, I decided to act on Toms advice and have a tinker around with the 145 Yagi. Tom - F8COD advised me to try vertical polarisation instead of horizontal on my Yagi antenna after noting better performance on his own satellite array. I set the 145MHz Yagi vertical and since then I have been hitting AO-51 with ease. I have also had some excellent QSO's via AO-7 and VO-52 on SSB. I am really impressed how well the Tripod mounted system is working. Merci Beaucoup Tom! Catch you via the "birds" soon!

Weather View From NOAA 15 Received Sunday 20th March at 16.50 UTC - Over N.W Europe

Image

Video Tour Of Simon's New Shack And Antenna Systems

Image
Earlier I got lucky in between a nappy change when I worked TJ3FC - Cameroon on 12 meters using my Carolina Windom antenna and FT-1000MKV. I Hope you like my second station its slowly taking shape and getting nearer the finishing stages. I shall hopefully finish off soon by fixing the SAT antenna and Tri-band Vertical up on the house.

Its a Girl!

Image
Finally after been two weeks late I am proud to be able to tell you all, we were blessed with a beautiful Daughter. She is only 3 days old and is already practising her CQ call as seen in the picture. We were up early again listening around the bands for some rare DX All the best from a very Happy Ham Family. 73

Latest Home Brew Metal Work Project - Tripod Mount For Satellite Yagis

Image
This week I continued with my latest radio project which was to be some kind of rotator mount that I could use to set up my latest Satellite array. As mentioned in my last post, I am planning on fixing the new Satellite antenna high up on the house. However, before I can begin working on that installation I want to build everything up at ground level and give it all a good testing out, ironing out any problems there may be on the way. With all this in mind I began to search through my scrap material pile that I have stashed away for a rainy day etc. I soon came across some heavy duty pipe and found some screwed/threaded bar. Then with a bit of sawing, grinding and hammering, I began fabricating the scrap pipe and metal which I finished off by welding it all up into a fairly substantial tripod. The finished tripod can easily be dismantled and folds up nice and neat allowing it to be transported without any hassle. I finished the job by painting it black, I then fitted the Yaesu GS5500 r

More Antenna Instalations

Image
I awoke nice and early on Sunday morning, walked the dog and then listened to the local RSGB news broadcast as usual. Straight after the weekly news broadcast, I headed outside and began installing a CAROLINA WINDOM 80 (133FT offset dipole). The CW-80 tunes nicely from 80M to 10M and after listening around the bands for a short while yesterday, it seems to be performing well on 40M, 17M & 15M. I will be testing it further on the rest of the bands and recording the results. The CW-80 is suspended between the House and a reasonably tall tree at the far end of the garden, as seen in the picture. I shall be fixing the CW-80 higher up once I install a mast on the rear of the house which will help elevate the wire high above the roof. The next job was to begin work on the Satellite antenna array that I am planing to use. I began by asembling the two antenna systems that I will be using, a 5 element 145MHz Yagi and a 30 element 435MHz X beam. I built both antennas up to a stage that can b

Home Made Radials & Connecting Bracket

Image
Despite another weekend of poor WX, I was determined to get started with the radial installation that I have been working on for use with my Hustler 6BTV antenna. I decided to start with radials cut for 20M and wanted each radial to be 1/2 wave lengths. I set about the second stage of the task by measuring four lengths of 2mm diameter wire and cutting them all the same. The four wire radial lengths were all cut at 34ft. I soldered small lugs on each end of the four wire radials, which I screwed to the brass stakes and brass mounting bracket (as seen in the previous post). To do this I used stainless steel self tapping screws. The image below shows the mounting bracket installed. It is located directly beneath the Hustler 6BTV feed point. The radial bracket is clamped around the ground stake as well as having a seperate short connecting wire fed directly from the antenna to the brass radial bracket. I will be adding more radials for 40m and other bands next time I get a couple of hours

Home Brew Radial Grounding stakes

Image
Since I installed the Hustler 6BTV at my new QTH I have been planning on making some radials similar to the ones I have attached to my other 6BTV which is up at the Moor top QTH. The original hustler has done me proud for over six years with its ground mount and simple wire radials. I really like the performance of these antennas as well as there durability, that's why I had to go for a second one! I got hold of some brass sheet which I cut into strips about 40mm wide. I then cut one end of each strip into a sharp V shape. The next job was to fold the opposite end over and tap it flush to provide extra strength when hammering the stake into the ground. I then folded the complete strip into the final V shaped angle approximately 45º creating a nice brass ground stake. The finishing touch was to drill a small hole to attach a soldered lug/wire radial which can be hammered beneath the ground surface in the garden. The second part of the job involved cutting some more brass sheet whic

SOTA S5/KA-018 QSO with S56CW/P

Image
Earlier this week whilst out and about in my mobile I was lucky enough to hear one of my radio pals coming through 5/9 + on 14.216MHz. I gave a call back to Marko - S56CW, who was working portable from SOTA S5/KA-018 (a summit located on top of a Slovenian Mountain). Marko was running bare foot 5W QRP, using his Yaesu FT-817 which can be seen working superbly in the video below that Marko made from the Mountain top. I have had the pleasure of working Marko from many locations whilst he has been out and about /P, from my mobile Yaesu FT-100 & Maldol HFC20 antenna. This particular summit was putting out a very nice signal from His SOTA station. Until the next time, thanks goes to S56CW - Marko for the video and pictures. Hope that you guys enjoyed the video.

New Shack is on the AIR

Image
We have been in our new house for a month now and at last I am starting to get through some of the decorating and DIY that is required when moving in. With less than 5 weeks to go before "baby HTS" will be with us you can imagine the QTH is undergoing a serious facelift with the smell of paint becoming the normal everyday occurrence. Over the last couple of weeks I have managed to temporally install 3 antennas allowing me to operate on HF and also hear local activity on VHF. The 3 antennas that I have erected for now, are a 135ft dipole with ladder feeder for 80m, a Hustler 6BTV (6 band trapped vertical) 80-10m and a tri-band vertical covering 50MHz, 145MHz and 433MHz. As of yet the satellite antennas and new GS5500 azimuth/ele rotator set-up, is still collecting dust as a nice long ladder or scaffold tower will be required to go ahead with the satellite install. For now working the Sats will have to be when I am at my Portable shack on the Moor. As you can see in the backgro

2E0HTS Appears in RadCom

Image
Next months (February) RadCom magazine arrived earlier this week courtesy of the RSGB. Inside the radio magazine I found myself appearing in the IOTA 2010 article which was a very nice surprise indeed. The picture inside RadCom shows myself in action during the IOTA 2010 contest which I enjoyed very much. The picture was taken at my Moor Top shack which is now my portable location as I have recently set up a second shack at our new family home. You can see my new table which is housing the FT1000mp and FT847 on the image above. The image below shows the page in Radcom where you can find 2E0HTS - IOTA Contest Station on page 26. The editor of the RadCom magazine has commented on my home made microphone mini tower which reads "Even the microphone is on a tower, but does it rotate?" The answer of course is yes! As long as you don't mind turning the mic by hand only, as of yet I haven't fit a motor h.i But you never know what I might get up to in my workshop next time I&#

Happy Birthday CQD

CQD was the international distress code that predated SOS. It celebrates its 107th birthday today as on January the 7th 1904 it was established by the Marconi Company as the first international radio distress signal. CQD is transmitted in Morse Code as — · — · — — · — — · · and although it is widely believed to be an acronym for ‘Come Quick Danger’ that is not the case. It is a general CQ call followed by D meaning distress. Before CQD was established ships would just go missing at sea, when radios were introduced onto ships they initially used CQ as a general call, however the introduction of a distress signal was widely accepted to be a good idea. Sadly CQD was short-lived as it was replaced by “SOS” at the Berlin Radiotelegraphic Conference of 1906 as three dots, three dashes and three dots could not be misinterpreted by anyone hearing it unlike CQD . Still, happy birthday to CQD a ground-breaking use of Morse Code and radio, the introduction of which no doubt saved lives.

New Year Brings New QTH

Hi All, I trust you are all having a great start to the New Year so far! For myself this has been a very busy time. We have moved into our new QTH that I mentioned a few posts back. So far the progress with the decorating is going well and I have temporarily installed a Hustler 6BTV and 135 foot Dipole allowing me to monitor HF in between the brush strokes and paper hanging. Louise (M3TLL) has also been busy propagating the baby which will be arriving in around 8 weeks time. I will be shortly posting pictures of my new QTH/Shack, but for now this is a quick update and opportunity to say Happy New Year to you all and I shall be back online at the new QTH as soon as the new internet connection is switched back on. 73 watch this space for more info on the latest escapades.

Merry Christmas from Ham Radio Blogspot

Image