Tuesday, April 26, 2011

Final Antenna Installations Completed!

I am halfway through my two week break from work and I have had a great week so far spending lots of quality time with Louise, Dudley and our six and a half week baby Daughter. As you know from my last post I have also been busy in between times trying to get my antennas set up and working more effectively.

I finished off my antenna installations by putting up a second mast to support a Tri-band vertical covering 6m, 2m & 70cms. The shorter leg of my Carolina Windom is also attached to the same mast and terminates at my out building. You can also see Dudley keeping an eye on what's going on in the doorway.
My HF antennas are simple but effective, in the background is my Hustler 6BTV and the previously posted homemade radial kit. Hanging at about 30 feet is my Carolina CW-80 wire antenna which is working really well on all of the HF bands, so is the 6BTV. Its nice having both antennas fed into the FT1000mkv mp as I can easily switch between the two as and when required, making the most of the varied angles and radiation patterns that change throughout the day.

Here is a different angle showing my Sat array, CW-80 wire and Tri-Band Vertical nice and elevated up above the QTH.
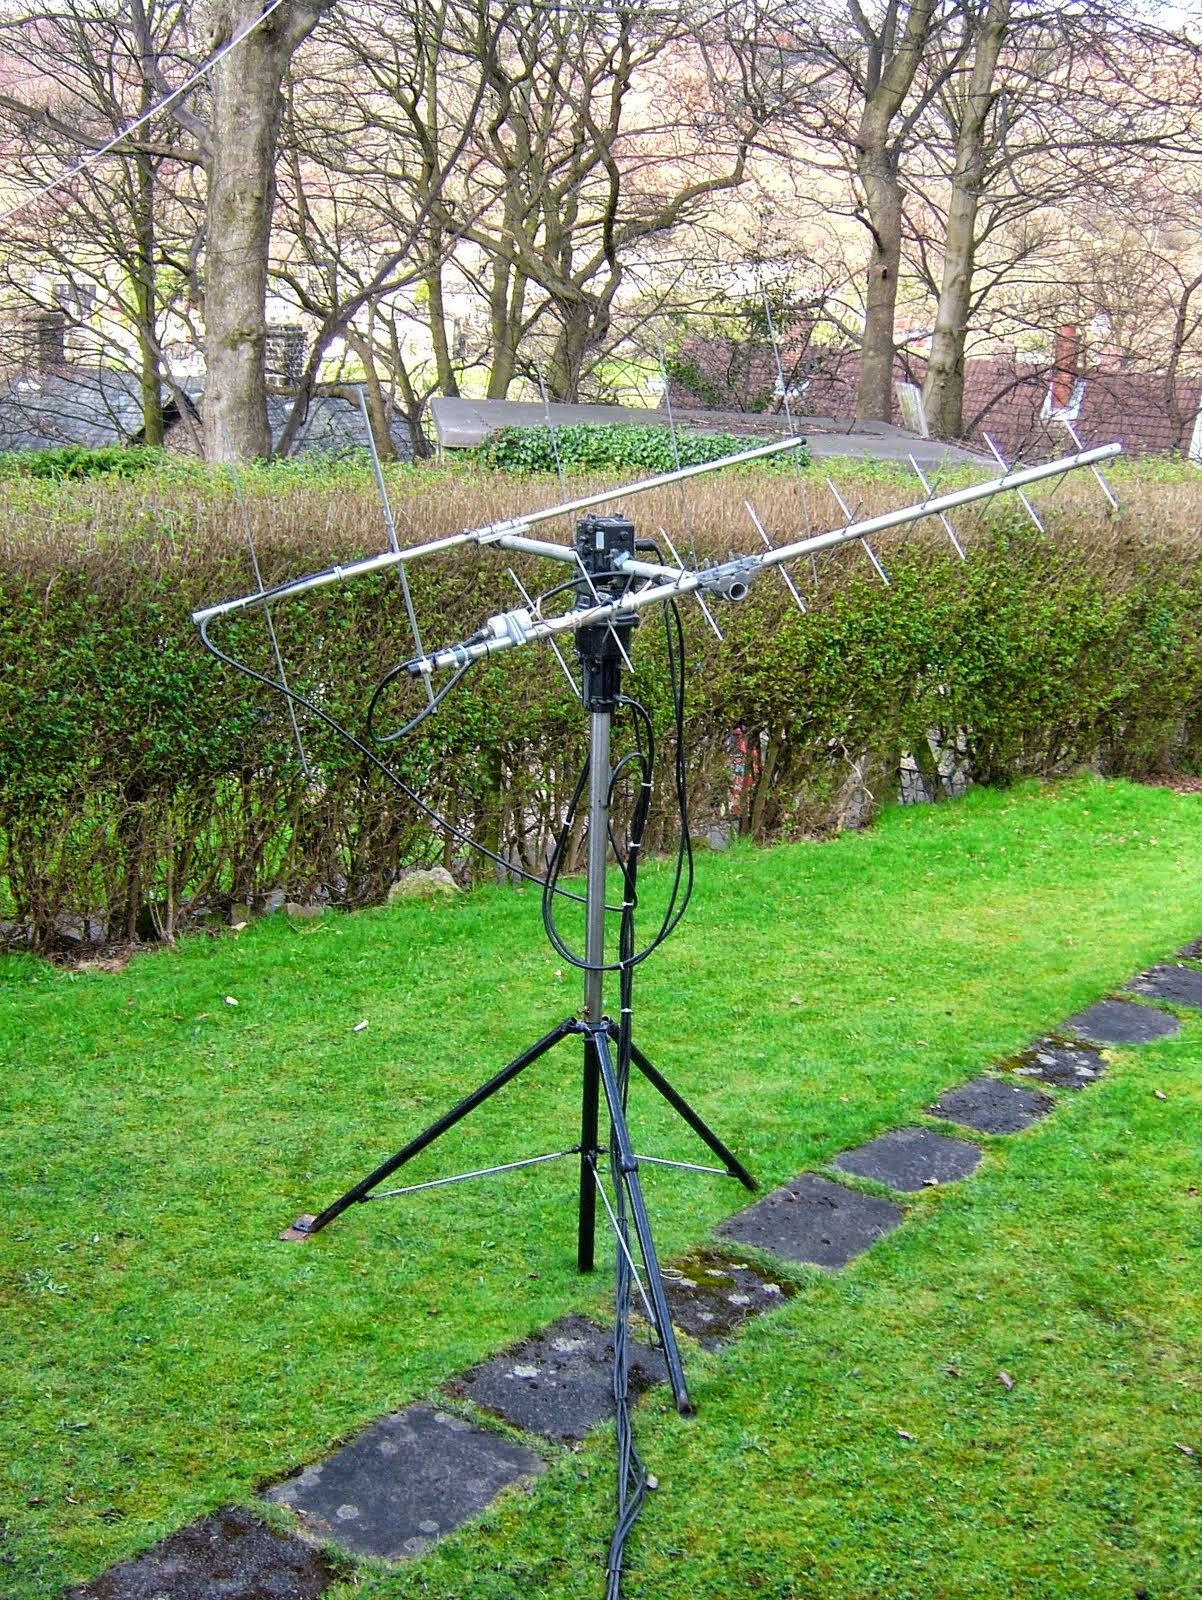
Here is a close up of my Satellite Antennas comprising of a 16 element X beam, a 5 element Yagi and a G-5500 Rotator. This antenna set up is now putting an excellent signal into both FM and SSB Satellites. I changed the 145MHz Yagi back to Horizontal polarity allowing me to also use the sat set up whilst working on 144MHz SSB now that it is up high clear of obstructions.

Listen out for me via the birds and on the HF bands over the next few days as I test out the completed final Antenna installation, that is until my next antenna idea. 73 for now.

Saturday, April 23, 2011

Raising The 145/435MHz Satellite Array

Earlier today we had a visit from a fellow Radio Amateur and friend Adam - 2E0LXA. I had asked Adam if he wouldn't mind lending a hand to fit my 145/435MHz Satellite Array up on the house. Adam installs antennas as well as supplies various radio communication equipment for a living so I was extremely fortunate to have his expertise on board and the antenna array went up a treat! Thanks Adam!

The 435MHz X beam and 5 Element 145MHZ Yagi dismantled from its tripod and fixed to a 15ft ally mast

Adam 2E0LXA up the ladder drilling the brick work to fix the home made "very heavy" mast brackets.

The result - 25 ft above the ground my 145/435MHz Satellite Array which is now working really well now it is clear of all obstructions. The tripod used previously was great but the house blocked signals from the south that were below 45° elevation which was a little annoying when the Sats passed by on that particular path. A problem no longer thanks to Adam and his ladders!

I borrowed Adams ladders for the rest of the day and also managed to fit my 6/2/70 Triband vertical up high on a second set of brackets I made. I attached a leg of my Carolina Windom off of the Triband vertical which now has also gained in height.

The remainder of my day was spent with the Family who are doing very well indeed seen below checking out the motor Cycles. I'll get some snaps of my Triband Vertical Antenna and post them tomorrow.

Happy Easter All, 73.

Monday, March 21, 2011

Testing Out The New Satellite Antenna


Here is a quick video of the latest satellite gear in action. The first Call I made is through SO-50 on FM, followed by 3 QSO using SSB via VO-52 with SQ9MES - IW4BIF - EA6SA.

Thanks for all the comments regarding this project, as you can hear in the video I am getting my signal into the satellites quite well with the Ft-847 and Tripod array. I hope to work some more of you via the "birds" as its always a pleasure to catch some of you guys that actually follow my crazy antics. 73 Happy DXing and SAT Chasing.

Sunday, March 20, 2011

Vertical Polarisation Is the Icing On The Cake


I have been having some good results with the latest Satellite array but still found AO-51 a little difficult at times due to the regular European pile up hi hi.

However, after receiving an interesting comment from Tom - F8COD regarding the Sat antenna set up, I decided to act on Toms advice and have a tinker around with the 145 Yagi.

Tom - F8COD advised me to try vertical polarisation instead of horizontal on my Yagi antenna after noting better performance on his own satellite array.

I set the 145MHz Yagi vertical and since then I have been hitting AO-51 with ease. I have also had some excellent QSO's via AO-7 and VO-52 on SSB. I am really impressed how well the Tripod mounted system is working. Merci Beaucoup Tom! Catch you via the "birds" soon!

Weather View From NOAA 15 Received Sunday 20th March at 16.50 UTC - Over N.W Europe

Monday, March 14, 2011

Video Tour Of Simon's New Shack And Antenna Systems


Earlier I got lucky in between a nappy change when I worked TJ3FC - Cameroon on 12 meters using my Carolina Windom antenna and FT-1000MKV. I Hope you like my second station its slowly taking shape and getting nearer the finishing stages. I shall hopefully finish off soon by fixing the SAT antenna and Tri-band Vertical up on the house.

Its a Girl!

Finally after been two weeks late I am proud to be able to tell you all, we were blessed with a beautiful Daughter.

She is only 3 days old and is already practising her CQ call as seen in the picture. We were up early again listening around the bands for some rare DX All the best from a very Happy Ham Family. 73

Friday, February 25, 2011

Latest Home Brew Metal Work Project - Tripod Mount For Satellite Yagis

This week I continued with my latest radio project which was to be some kind of rotator mount that I could use to set up my latest Satellite array.

As mentioned in my last post, I am planning on fixing the new Satellite antenna high up on the house. However, before I can begin working on that installation I want to build everything up at ground level and give it all a good testing out, ironing out any problems there may be on the way.

With all this in mind I began to search through my scrap material pile that I have stashed away for a rainy day etc.
I soon came across some heavy duty pipe and found some screwed/threaded bar. Then with a bit of sawing, grinding and hammering, I began fabricating the scrap pipe and metal which I finished off by welding it all up into a fairly substantial tripod.

The finished tripod can easily be dismantled and folds up nice and neat allowing it to be transported without any hassle.

I finished the job by painting it black, I then fitted the Yaesu GS5500 rotator to the top of it. (as seen below in the two images).

Next, I was ready to install the two Satellite Yagi antennas.

I fitted the 435 X beam and the 145 Yagi with a short ally pole keeping the weight down to a minimum.

The video below shows the Satellite array up and running working well at ground level.


I have already made a couple of successful QSO via VO-52 as well as hearing AO-51 nice and loud last night. The new setup will be even better once I complete the full installation on the house.

Hope to hear you via the SATs soon!

Monday, February 21, 2011

More Antenna Instalations

I awoke nice and early on Sunday morning, walked the dog and then listened to the local RSGB news broadcast as usual.

Straight after the weekly news broadcast, I headed outside and began installing a CAROLINA WINDOM 80 (133FT offset dipole).

The CW-80 tunes nicely from 80M to 10M and after listening around the bands for a short while yesterday, it seems to be performing well on 40M, 17M & 15M. I will be testing it further on the rest of the bands and recording the results.

The CW-80 is suspended between the House and a reasonably tall tree at the far end of the garden, as seen in the picture.
I shall be fixing the CW-80 higher up once I install a mast on the rear of the house which will help elevate the wire high above the roof.

The next job was to begin work on the Satellite antenna array that I am planing to use. I began by asembling the two antenna systems that I will be using, a 5 element 145MHz Yagi and a 30 element 435MHz X beam. I built both antennas up to a stage that can be completed when I am ready to finish the installation.

The next stage was to get the Yaesu GS5500 Azimuth/Elevation rotator set up. I wanted to check it and get it ready to be at hand for when I am at the construction/assembly stage.

Now, the not so fun part! Yes this was the part when the hard work started.

I began runing 2 control cables and 2 coaxial feeders from out in the garden to back inside the shack. (located at the opposite side of the house = Sods Law!).
I ended up spending a few hours doing the job of running the cables making sure that all cables were as neatly installed as possible. Finally I reached the back of my Yaesu FT-847 and GS5500 Azi/Ele Control unit, there I tinned/soldered the wires and connected them up ready for the outdoor work.

I finished yesterdays antenna antics off by identifing which coaxial feeder was which, I did this simply by using a electronic test multi meter held across the SO plug connector at the shack end of the coax . At the other end I attached an old antenna socket shorted out with a croc link lead to the end of one feeder that I had suspected to be for 145MHz.

All I need now is some more spare time and a pair of good ladders so I can fit the Satellite antennas up on the house with some nice heavy brackets that I made a while ago.

Saturday, February 19, 2011

Home Made Radials & Connecting Bracket

Despite another weekend of poor WX, I was determined to get started with the radial installation that I have been working on for use with my Hustler 6BTV antenna.

I decided to start with radials cut for 20M and wanted each radial to be 1/2 wave lengths.

I set about the second stage of the task by measuring four lengths of 2mm diameter wire and cutting them all the same. The four wire radial lengths were all cut at 34ft. I soldered small lugs on each end of the four wire radials, which I screwed to the brass stakes and brass mounting bracket (as seen in the previous post). To do this I used stainless steel self tapping screws.

The image below shows the mounting bracket installed. It is located directly beneath the Hustler 6BTV feed point.

The radial bracket is clamped around the ground stake as well as having a seperate short connecting wire fed directly from the antenna to the brass radial bracket.

I will be adding more radials for 40m and other bands next time I get a couple of hours spare. Until then, I am happy with the first four radials cut for 20m.
They seem to be doing a good job so far during a quick test just now, I am getting through to plenty of stations all over EU and USA without to much trouble on 50W.

I'm looking forward to more messing about with my antennas and plenty more posting on here. Thanks for the visit. 73

Friday, February 11, 2011

Home Brew Radial Grounding stakes


Since I installed the Hustler 6BTV at my new QTH I have been planning on making some radials similar to the ones I have attached to my other 6BTV which is up at the Moor top QTH. The original hustler has done me proud for over six years with its ground mount and simple wire radials.

I really like the performance of these antennas as well as there durability, that's why I had to go for a second one!

I got hold of some brass sheet which I cut into strips about 40mm wide. I then cut one end of each strip into a sharp V shape. The next job was to fold the opposite end over and tap it flush to provide extra strength when hammering the stake into the ground. I then folded the complete strip into the final V shaped angle approximately 45º creating a nice brass ground stake. The finishing touch was to drill a small hole to attach a soldered lug/wire radial which can be hammered beneath the ground surface in the garden.

The second part of the job involved cutting some more brass sheet which I formed into a circular shape to be fixed at the base beneath the hustler. I drilled lots of holes in the brass grounding plate allowing me to screw many radials into it. I also formed some 8mm round bar into a U clamp which I fit to the Brass grounding plate ready to attach to the 6BTV antenna.

WX permitting I plan to have a play with my new radial kit sometime over the weekend, I have a roll of 2.5mm wire, a hammer and tape measure ready on stand by. I will try get some pictures for you to see the result. Till next time 73 have a good weekend.

Thursday, February 10, 2011

SOTA S5/KA-018 QSO with S56CW/P

Earlier this week whilst out and about in my mobile I was lucky enough to hear one of my radio pals coming through 5/9 + on 14.216MHz.

I gave a call back to Marko - S56CW, who was working portable from SOTA S5/KA-018 (a summit located on top of a Slovenian Mountain).

Marko was running bare foot 5W QRP, using his Yaesu FT-817 which can be seen working superbly in the video below that Marko made from the Mountain top.
I have had the pleasure of working Marko from many locations whilst he has been out and about /P, from my mobile Yaesu FT-100 & Maldol HFC20 antenna. This particular summit was putting out a very nice signal from His SOTA station.

Until the next time, thanks goes to S56CW - Marko for the video and pictures. Hope that you guys enjoyed the video.

Saturday, January 22, 2011

New Shack is on the AIR

We have been in our new house for a month now and at last I am starting to get through some of the decorating and DIY that is required when moving in. With less than 5 weeks to go before "baby HTS" will be with us you can imagine the QTH is undergoing a serious facelift with the smell of paint becoming the normal everyday occurrence.

Over the last couple of weeks I have managed to temporally install 3 antennas allowing me to operate on HF and also hear local activity on VHF. The 3 antennas that I have erected for now, are a 135ft dipole with ladder feeder for 80m, a Hustler 6BTV (6 band trapped vertical) 80-10m and a tri-band vertical covering 50MHz, 145MHz and 433MHz.

As of yet the satellite antennas and new GS5500 azimuth/ele rotator set-up, is still collecting dust as a nice long ladder or scaffold tower will be required to go ahead with the satellite install. For now working the Sats will have to be when I am at my Portable shack on the Moor.
As you can see in the background of the image below which shows the 6BTV, the Moor is less than a mile away as the new QTH is situated on the edge of the lovely moorland.

The Hustler 6BTV HF Vertical antenna is ground mounted in the same way as my other 6BTV at the now portable shack. Here at the new garden The SWR is 1.1 without the ATU from 40m right through to 10M. The vertical tunes 80m up well with the ATU in line and has a very low noise level on receive. So far I have worked across the pond to the US on it with ease, I also heard some nice VK and ZL signals coming very well, as well as hearing signals out of HS land.
The tri-band antenna works reasonable in its very temporary position but I am sure it will be greatly improved once it is up high on the top of the house.
Louise will also be a bit happier hi hi. I dont know what she means when she says "it looks stupid there" Lou knows it wont be there for long!

The main problem I can foresee is how to evict her from my favorite seat in the house? As you can see she is not in a hurry to give up the shack seat just yet. If I do some more decorating maybe than she will move over and let me get to my lovely radios h.i
For those of you that were wondering about Dudley the DX Hound, here Dudley can be seen getting himself acquainted with the living room carpet which lets face it looks like a great spot to catch some Zs if your a four legged type. The HTS family is settling in very well indeed, however if the decorating gets a bit much a quick drive up the road takes us back to the Moor Top Holiday Shack where my other Hustler Vertical, CW160, Delta loop, IO-10 Sat beam and Rigs are awaiting me.

73 hope to catch you from the new QTH or portable Shack on the hill.

2E0HTS Appears in RadCom

Next months (February) RadCom magazine arrived earlier this week courtesy of the RSGB.

Inside the radio magazine I found myself appearing in the IOTA 2010 article which was a very nice surprise indeed.
The picture inside RadCom shows myself in action during the IOTA 2010 contest which I enjoyed very much.

The picture was taken at my Moor Top shack which is now my portable location as I have recently set up a second shack at our new family home.

You can see my new table which is housing the FT1000mp and FT847 on the image above. The image below shows the page in Radcom where you can find 2E0HTS - IOTA Contest Station on page 26.

The editor of the RadCom magazine has commented on my home made microphone mini tower which reads "Even the microphone is on a tower, but does it rotate?"
The answer of course is yes! As long as you don't mind turning the mic by hand only, as of yet I haven't fit a motor h.i
But you never know what I might get up to in my workshop next time I'm tinkering around!

Friday, January 07, 2011

Happy Birthday CQD

CQD was the international distress code that predated SOS. It celebrates its 107th birthday today as on January the 7th 1904 it was established by the Marconi Company as the first international radio distress signal.
CQD is transmitted in Morse Code as — · — · — — · — — · · and although it is widely believed to be an acronym for ‘Come Quick Danger’ that is not the case. It is a general CQ call followed by D meaning distress.
Before CQD was established ships would just go missing at sea, when radios were introduced onto ships they initially used CQ as a general call, however the introduction of a distress signal was widely accepted to be a good idea.
Sadly CQD was short-lived as it was replaced by “SOS” at the Berlin Radiotelegraphic Conference of 1906 as three dots, three dashes and three dots could not be misinterpreted by anyone hearing it unlike CQD .
Still, happy birthday to CQD a ground-breaking use of Morse Code and radio, the introduction of which no doubt saved lives.

SSTV From SPACE!

It has been a very good month if you enjoy SSTV! I have been enjoying receiving Slow Scan Tele Vision images up on UHF 437 MHz from Space. H...